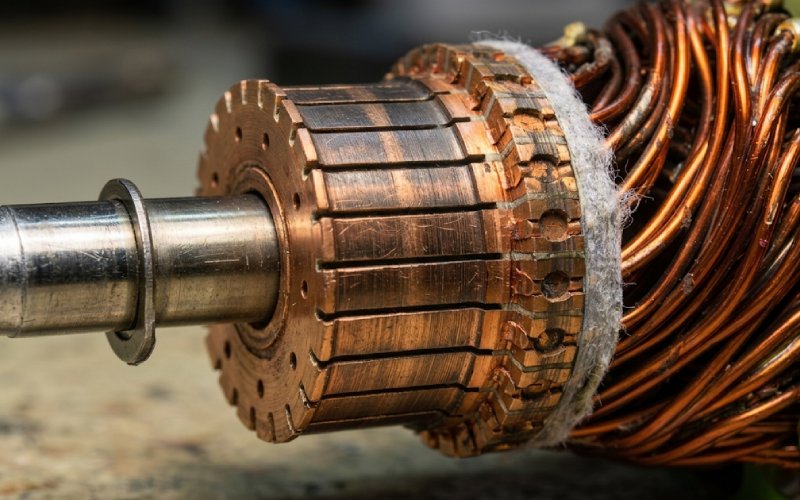
Loose Commutator Bars in DC Motors: How to Prevent Lifting, High Bars, and Repeat Failure
Loose commutator bars are almost never the first defect.
In most DC motors, bar lift starts earlier. Heat. Runout. Brush instability. A resistive path near the riser end. Sometimes all of them at once, just not evenly enough to look obvious on day one.
This article stays on prevention. The goal is simpler: catch the conditions that let a commutator bar loosen, rise, or start acting high before the surface turns into the least important part of the problem.
Table of Contents
TL;DR
- A lifted commutator bar is usually the result of an earlier thermal, mechanical, or electrical defect.
- If one bar or one bar group keeps looking wrong, stop treating it as a surface-only issue.
- Turning the commutator may restore geometry. It does not restore lost restraint, fix a bad connection, or correct brush bounce.
- The checks that matter most are runout, spring-pressure spread, thermal pattern, bar-to-bar condition, and slot finish.
- If the defect returns after machining, the machine is telling you the same thing twice.
What causes loose or lifted commutator bars in DC motors
1. Local overheating changes the fit
Average motor temperature can look acceptable while a small section of the commutator runs hot. That is how trouble gets missed.
Repeated stalled starts, long low-speed high-current duty, overloaded acceleration, or weak current transfer at a single path can heat one section more than the rest. Copper grows. Insulation does not move the same way. Then cooldown happens unevenly. Over time, the bar stack stops behaving like one tight unit.
The bar does not need to jump high in one event. A few microns here, then more. That is enough.
2. Loss of restraint in the commutator build
If the retaining system loses force, or if support insulation is damaged, the bar can begin moving under load even when the face still looks usable.
This is why a high bar should not be treated as a simple machining defect. A bar that has lost support may machine flat and still come back wrong after the next duty cycle. Same defect. New surface.
3. Brush bounce becomes repeated impact
Brushes do not need severe sparking to do damage. Mild bounce is enough if it repeats long enough.
Once the commutator is slightly out of round, or spring pressure is uneven, or holder geometry is off, the brush stops gliding and starts tapping. Then striking. Then unloading and reloading current in short cycles. The result is edge distress, unstable film, local heating, and a surface pattern that looks like commutation trouble even when the root cause is partly mechanical.
4. Electrical asymmetry creates recurring hot bars
A poor riser connection, high-resistance path, partial winding defect, or unequal current distribution can keep the same bar or group of bars running hotter than its neighbors.
That matters because recurring heat leaves a pattern. Not always dramatic. Often a pale bar, a bar that will not hold film, or one area that cleans up after dressing and then goes wrong again.
If the pattern repeats at fixed spacing, do not start with abrasives. Start with the current path.
5. Slot condition and mica finish make a healthy commutator look unstable
High mica, mica fins, poor chamfer, copper dragged over slot edges, or conductive debris in the undercut will all disturb brush contact.
A machine can look like it has a loose-bar problem when the brush is actually riding insulation edges or striking burrs. Those cases still deserve urgency, because brush instability can become real structural damage if left alone.
Early warning signs before a bar lifts
The surface usually speaks before the bar moves enough to be obvious.
Look for these first:
| What you see | What it usually means | What to check next |
|---|---|---|
| One bar sounds dull on a light tap, or seems to move slightly relative to adjacent bars | Local loss of restraint or damaged support condition | Bar security, support insulation, retaining components, riser end condition |
| One bar or one group stays pale while the rest carry film | Reduced current in that path or a resistive connection | Riser joints, bar-to-bar resistance trend, winding symmetry |
| Brush chatter, edge wear, or repeating streaks | Runout, holder geometry, spring-pressure spread, vibration | TIR, bearing condition, holder alignment, brush seating |
| Irregular washy burn marks around the circumference | Mechanical instability more than pure electrical commutation trouble | Shaft movement, balance, bearing fit, holder rigidity |
| Copper drag, smeared copper, or dirty slot edges | Overheating, unstable contact, bad slot finish | Surface temperature, undercut condition, burrs, slot cleanliness |
| The same location goes wrong again after turning | Root cause was not the surface | Thermal pattern, connection quality, structural condition of the build |
A useful rule: if the defect repeats in position, assume there is memory in the machine. Heat memory. Mechanical memory. Electrical memory. Sometimes all three.
Numeric checkpoints that should not stay vague
These are field checkpoints, not universal acceptance limits. Final values should follow the motor design, duty cycle, commutator diameter, speed, brush grade, and your repair spec.
Still, some things should be numbers. Not adjectives.
| Check item | Practical field checkpoint | Why it matters |
|---|---|---|
| Brush spring-pressure spread | Keep brushes in the same set within ±10% of the target value | Uneven pressure drives unequal film formation, chatter, and localized heating |
| Commutator surface runout | For many industrial units, shops aim to return the surface as low as practical; about 0.025-0.05 mm TIR is a common working target on medium-sized machines | Runout converts directly into brush bounce and impact loading |
| Undercut depth after machining | Often kept around 0.8-1.5 mm on many industrial commutators, with clean slot walls and no burrs | Too shallow invites brush strike on insulation; too deep removes support you may want to keep |
| Brush seating before full-duty return | Target at least 80% contact area on the brush face unless the maintenance procedure for that machine says otherwise | Poor seating concentrates current and raises local temperature quickly |
| Thermal imbalance across bars | A bar or group that runs 15-20°C hotter than adjacent bars at stable load deserves investigation | Repeating hot-bar patterns often point to electrical or mechanical asymmetry, not just surface film |
| Trend change in one outage cycle | Any one section showing a measurable shift while the rest stay stable is enough reason to stop and inspect | Bar lift often develops locally, not uniformly |
These values are not meant to replace the machine-specific limit set. They are there to stop the usual failure mode: everyone agrees something feels “a bit high,” then nobody measures it.
Why machining alone does not solve repeat bar lift
Machining fixes shape.
That is all.
If a bar is high because the commutator is out of round from service wear, turning may solve it. If the bar is high because restraint was lost, or one current path is cooking the same section, or the brush is striking the same location every revolution, turning only resets the clock.
A common field sequence looks like this:
- One bar appears high.
- The surface is turned.
- The machine runs cleaner for a short period.
- The same zone discolors, chatters, or rises again.
- The second outage now includes more damage than the first.
That pattern is not bad luck. It is a missed diagnosis.
Advanced diagnostic checks worth adding now
If the commutator has already shown one repeat defect, move beyond visual inspection.
Infrared thermal patterning
Use thermal imaging or fixed-point temperature comparison under stable load. Do not just record the hottest absolute value. Compare bar groups and repeat the scan under similar duty. The pattern matters more than the peak.
Runout trend, not one-off runout
A single TIR reading is useful. A trend is better. Compare readings over time and correlate them with brush wear, sparking reports, and bearing work. Some commutators do not fail by exceeding a dramatic limit. They fail by drifting.
Bar-to-bar resistance comparison
When one region repeatedly refuses to behave, compare the electrical path between adjacent bars and through the riser section. The goal is not laboratory precision. The goal is to find the outlier that keeps matching the surface defect.
Vibration and brush-holder stability
Check shaft motion, bearing fit, holder rigidity, and spring consistency as one package. A commutator can be sound and still look bad if the brushgear is not mechanically stable.
Slot and edge inspection under magnification
Small mica fins and copper burrs are easy to miss and easy to dismiss. They should not be dismissed. Tiny geometry defects at the slot edge can create repeated brush disturbance that grows into a much larger problem.
A prevention routine that actually reduces loose-bar cases
1. Start with the surface, but do not stop there
Inspect for high bars, flat spots, color changes, slot contamination, copper drag, and one-zone film loss. This is the fast read. It is not the diagnosis.
2. Measure the mechanical basics every outage
Record runout, bearing condition, holder alignment, and spring-pressure spread. Do not rely on last outage notes if the machine has had overloads, vibration events, or repeated starts.
3. Treat single-bar patterns as electrical until proven otherwise
If one bar, one riser group, or one repeating pitch keeps showing distress, check the current path before you dress the surface again.
4. Control slot finish after any turning work
Undercut correctly. Clean the slots. Remove burrs. Break sharp edges where required. A freshly machined commutator can be put back into service already prepared to misbehave if slot finish is careless.
5. Trend temperature and appearance together
A hot zone with no visible damage is still a defect. A visible defect with no thermal trend is usually still mechanical. Put both readings on the same maintenance record.
6. Do not accept “it looks better now” as a release criterion
Release should be based on measured geometry, brush condition, thermal behavior, and electrical consistency. Visual cleanup is not evidence of recovery.
The maintenance mistakes that usually come first
- Recutting the surface before checking whether the bar is mechanically secure
- Treating a pale bar as a film issue without checking current transfer
- Replacing brushes without measuring spring-pressure spread
- Ignoring light chatter because sparking is still “not too bad”
- Leaving undercut depth or slot cleanup to visual judgment alone
- Checking only average motor temperature while one bar group runs hot
- Calling the second occurrence “recurrence” when the first diagnosis was never closed
FAQ
Why is my DC motor commutator sparking and bouncing?
Usually because the brush is losing stable contact. The common drivers are runout, uneven spring pressure, poor seating, holder misalignment, high mica, or a hot bar group that changes the surface locally. Do not treat sparking and bounce as separate symptoms. In practice they feed each other.
How do I know if a commutator bar is loose?
A loose bar often shows up as a dull response on a light tap, slight movement relative to adjacent bars, recurring brush chatter at the same position, or a defect that returns after machining. If the same location keeps reappearing, assume the bar or its support condition needs inspection.
Can turning the commutator fix a high bar?
It can fix geometry. It cannot fix lost restraint, a bad riser connection, winding asymmetry, unstable brushgear, or repeat local overheating. If the bar comes back high after turning, the surface was not the real problem.
What causes one commutator bar to run hotter than the others?
Usually a local current-transfer issue, a resistive connection, unequal brush loading, or recurring impact at one position. One hot bar is useful information. It is rarely random.
Should I keep running a motor with one slightly high bar?
Not for long. A slightly high bar becomes a brush-impact point. That increases arcing, edge wear, copper transfer, and thermal concentration. The cost of waiting is usually larger than the cost of stopping.
How often should runout and spring pressure be checked?
At minimum during planned outages, after brush changes, after bearing or shaft work, after overload events, and whenever operators report chatter, sparking, or repeat commutator discoloration. If the machine has already had one loose-bar event, trend both items routinely.
What is the biggest mistake in loose-bar troubleshooting?
Treating the commutator as a surface-only component. The visible defect sits on the face. The cause often does not.
Final takeaway
A lifted commutator bar is usually the last visible stage of an earlier defect.
So the prevention strategy is not “machine it sooner.” It is:
- keep the commutator round,
- keep the brush contact stable,
- keep the slot geometry clean,
- keep current transfer even,
- and measure the local pattern before the surface forces a rebuild.
If bar lift has already returned once after turning, stop calling it a finishing issue. Review the armature as a system.