Commutator Bar Repair: What Actually Solves the Problem
Commutator bar repair goes wrong when the job is treated as a surface-finishing exercise. It usually is not. A polished commutator can still have loose bars, unstable risers, bad brush contact, poor film, wrong neutral, or an armature fault that will mark the surface again almost immediately. One clean skim cut. Then the sparks return.
The better approach is plain: decide first whether the defect is surface-only, bar-to-riser, or armature-system. Then machine only what the defect actually requires. EASA guidance and field repair papers line up on the same point here: bar tightness, roundness, undercutting, chamfering, brush seating, and riser integrity matter more than making the copper look new.
Table of Contents
Start with the failure pattern, not the cutter
A commutator usually tells on itself.
| Symptom on the commutator | Likely fault | Repair note |
|---|---|---|
| One bar or a short group burns repeatedly | High-resistance riser, bad connection, loose bar, local armature issue | Do bar-to-bar trending and inspect risers before machining. A skim cut may hide it, not fix it. |
| Bar edges burn around much of the circumference | Brush alignment issue, bad interpoles, wrong brush grade, low spring pressure | Correct the electrical and brush setup first; surface work alone will not hold. |
| Every other bar, or every few bars, darkens | Uneven current distribution or armature winding fault | Treat it as an electrical pattern. Check the winding, not just the copper. |
| Copper looks smeared or dragged | Overheating softened the surface; often linked to a larger issue | Stop and find the heat source. Repair load, contamination, brush, or circuit cause before refinishing. |
| Brush chipping, chatter, ridge feel at slots | Mica too high, poor undercut, bar-edge burrs, adjacent-segment step | Recut slots correctly and chamfer. Check adjacent segment differences, not only overall runout. |
| Thick black film, rapid re-fouling | Oil contamination and poor current transfer | Remove contamination source first; otherwise the surface will fail again. |
That table is the whole article in small form, really. Read the pattern. Then choose the repair.
The check most shops rush past: bar stability
Before turning, check for loose bars. Old-school tap testing is still referenced by EASA and repair articles: a tight bar gives a crisp sound, a loose one gives a dull response, and you should not feel motion relative to adjacent bars. If bars are loose, tightening to manufacturer specification may be possible, but random force is not; too much pressure can distort the bar set.
This matters because a high bar is not always a wear issue. Sometimes it is a clamping issue. Sometimes stall damage. Sometimes a bar has softened. Sometimes the riser is the real defect and the bar is only showing you the result. One case study on a 700 HP DC motor found suspect high-riser connections only after better bar-to-bar testing exposed varying high resistance that the older shop method missed.
So, before any cut:
- Check bar tightness.
- Inspect risers for cracks, leakage, burn, and movement.
- Trend bar-to-bar readings.
- Check whether the pattern repeats by pitch or stays local.
If step 1 through 4 are skipped, the repair is mostly cosmetic.
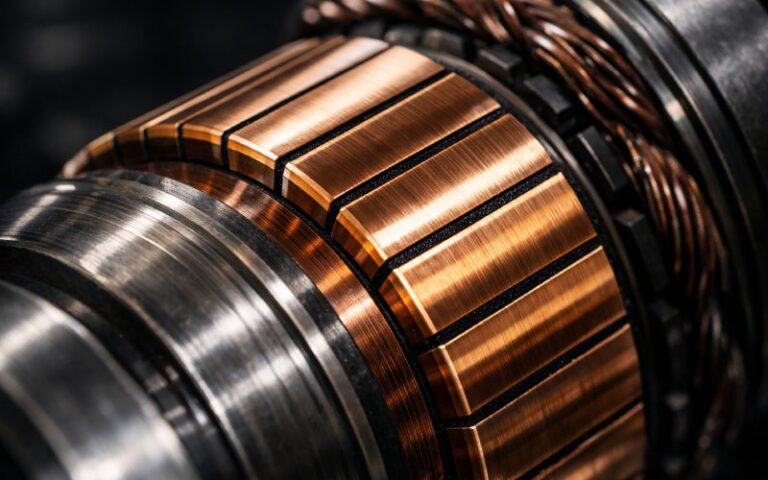
Surface condition: know what is normal, and what is not
A serviceable commutator does not need to look bright copper. In fact, raw copper across the running track is often a warning, not a success mark. Repair guidance notes that a normal film can range from light straw to jet black after some running time, and that this film supports lubrication at the brush face. Raw copper, by contrast, can point to wrong brush grade, low current density, or gritty contamination.
There is another trap here. A commutator that looks a little patchy or wavy but is running stably may not deserve machining at all. Morgan’s surface-maintenance guidance makes this point sharply: if the machine is performing satisfactorily and wear is not progressive, leave it alone. More damage is created by unnecessary reconditioning than many people like to admit.
That is worth repeating. Not every imperfect surface needs repair.
When turning is justified
Turn the commutator when it is out of round, grooved, burned, flat-spotted, or otherwise physically degraded enough to disturb the brushes. But the cut should be only enough to restore roundness and remove the defect. Not more. Repair literature is consistent on this: excessive cutting reduces life, and decorative “threading” of the surface to help seat brushes is a bad practice because it cuts contact area and increases wear.
A more useful metric than gross TIR, especially on lower-speed machines, can be the difference between adjacent segments. Morgan notes that even where overall eccentricity may be tolerated, more than about 0.025 mm difference between adjacent segments can disturb the brushes badly enough to start later trouble. That point gets missed all the time because total runout looks acceptable on paper. Adjacent bar step. That is the one that bites.
EASA’s armature repair guidance also emphasizes concentricity with the shaft and indicates the bearing journals within 0.0005 in. before machining, so the commutator does not come back eccentric in service.
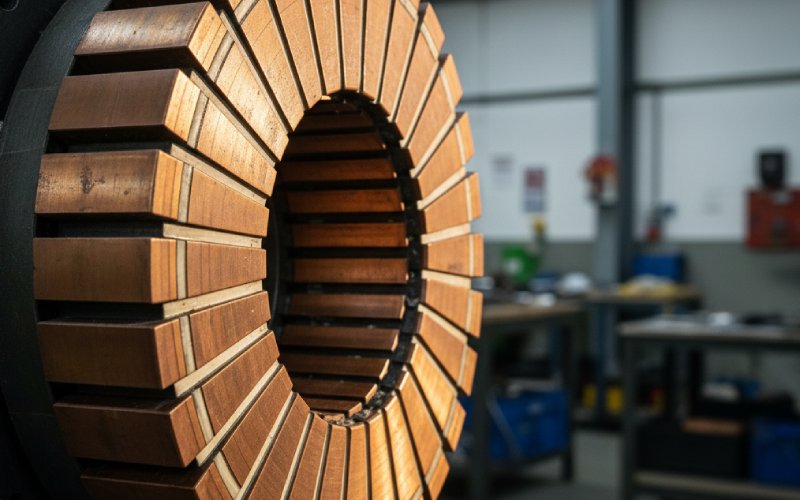
Undercutting: no single number fits every machine
The lazy answer to undercut depth is a fixed dimension. The better answer is geometry plus OEM spec.
Several repair references describe undercut depth in slightly different but compatible ways:
- depth roughly equal to the mica thickness between bars,
- or one to one-and-a-half times slot width,
- or around 1/32 in. to 3/64 in. for common U-slots,
- while some OEM-style maintenance guidance flags re-undercutting once slot depth drops below 1.0 mm after grinding.
That spread is not a contradiction. It reflects different bar sizes and machine designs.
What does hold across sources:
- the cutter should match the slot without taking excess copper,
- U-slots are commonly preferred when access allows,
- chamfering the bar edges is necessary,
- and cutting too deep can let dust stay in the slot instead of being thrown clear.
Martindale’s guidance is especially practical here: for U-slots, 1/32–3/64 in. is a typical target unless OEM data says otherwise, cutter width should slightly exceed mica thickness, and a chamfer around 1/64 in. is usually enough to remove burr and work-hardened edge.
The repair mistake is not shallow undercut alone. It is shallow undercut plus burrs. Or proud side mica. Or a slot that looks clean until a brush hits it at load.
Chamfering is not a detail
A lot of repeat failures come from burrs left after undercutting. The bar top looks fine under a lamp. The brush sees something else.
EASA and other maintenance references call for chamfering the bar edges after undercutting to prevent brush chipping, noise, and unstable transition across the slots. Martindale says every slot should be checked individually for fins, side mica, sharp edges, and copper particles after cutting. That individual slot check is slow. It is still cheaper than pulling the armature again.
Also, clean and chamfer the front and back ends of the bars where needed. EASA notes this helps reduce flashover risk, and protection of exposed end insulation against carbon tracking matters on rebuilt units.
Do not “repair” a bad bar with abrasives and hope
In-place stones and cleanup brushes have a place. They can remove localized contamination, old film, light ridges, and some high spots with less downtime. But that is not the same thing as repairing a loose bar, bad riser, or winding issue. One is surface conditioning. The other is fault removal. Confusing the two keeps service calls busy.
And be careful with abrasives. EASA specifically warns against emery cloth with aluminum oxide on commutator and slip-ring surfaces, and another repair paper says brush seating should use plain sandpaper, not emery cloth or paper containing metal.
That rule is simple enough: use the right seating material, or do not seat brushes that way.
Brush seating after bar repair
After machining and undercutting, brush contact has to be restored properly. Poor seating creates its own fake “bar problem” almost immediately.
A practical repair-shop method described in maintenance literature is to wrap sandpaper around the commutator with the abrasive facing outward, install the brushes under spring pressure, rotate in the normal direction of operation, and verify that more than 95% of the brush face contacts the surface. Then finish with a finer paper.
But seating is only part of restart. The surface film has to come back as well. If the machine returns to service with raw copper, low current density, oily contamination, wrong brush grade, or silicone contamination nearby, brush wear can become rapid and the repair will be blamed for a system problem. One repair paper even notes that the hottest brush in an infrared inspection may be the good brush if a neighboring shunt connection is loose and carrying less current. That is the kind of detail that saves misdiagnosis.
When commutator bar repair should stop and replacement should start
There is a point where repair time stops being repair economy.
Reject or escalate the job when you find one or more of these:
- loose or unstable bars that cannot be brought back to specification,
- repeated high-resistance bar-to-bar deviations linked to failed risers,
- bars softened by heat, with recurring flats or drag,
- structural damage at risers or bar ends,
- progressive electrical marking that points to winding faults rather than surface wear.
In those cases, the right answer may be re-risering, rewind, or commutator replacement. Not another cut.
A repair sequence that usually holds up in service
For most industrial DC motor and generator work, the sequence below is a safer default than “turn it and see.”
- Classify the pattern — local bar fault, repeating electrical pattern, or general surface wear.
- Check bar tightness and risers before machining.
- Measure roundness and adjacent-segment step, not only total runout.
- Turn only enough to restore roundness and remove damage. Do not thread the surface.
- Undercut to the machine geometry or OEM data, then chamfer every slot edge.
- Remove all copper particles, fins, side mica, and burrs.
- Seat the brushes correctly and verify near-full face contact.
- Restart under watched conditions so film, temperature, and sparking pattern can be judged early. Raw copper and immediate re-marking mean the root cause is still there.
That sequence is not glamorous. It is just the one that wastes less time.
FAQ
Can a single burned commutator bar be repaired without replacing the whole commutator?
Sometimes, yes. But only if the defect is truly local and the bar remains mechanically sound. A single burned bar can also be the visible result of a bad riser or a high-resistance armature connection. In that case, resurfacing alone will not last. Bar-to-bar testing and riser inspection come first.
How deep should mica be undercut during commutator bar repair?
There is no universal depth. Common guidance includes depth equal to mica thickness, or about one to one-and-a-half times slot width. Martindale also gives a typical U-slot range of 1/32 in. to 3/64 in., while some OEM-style maintenance guidance calls for re-undercutting once slot depth is under 1.0 mm after grinding. Use machine geometry and OEM data together.
Why does arcing come back right after a commutator has been turned?
Because the surface was repaired but the cause was not. Common reasons include loose bars, bad risers, wrong brush grade, low spring pressure, poor brush alignment, bad interpoles, oil contamination, or winding faults that create repeating slot-bar patterns.
Is it acceptable to stone or clean a commutator in place?
For light contamination or minor surface cleanup, sometimes. For loose bars, bad risers, or persistent electrical marking, no. In-place cleanup tools are surface-treatment tools, not substitutes for structural or electrical repair.
Should emery cloth be used for brush seating after bar repair?
No. EASA does not recommend emery cloth with aluminum oxide on these surfaces, and repair guidance on brush seating says to use sandpaper rather than emery cloth or metallic abrasive paper. After seating, verify that the brush face contact is above 95%.
Is a patchy commutator surface always a repair trigger?
No. If the machine is performing properly and wear is not progressive, unnecessary reconditioning can create more trouble than it removes. Surface appearance alone is not enough; judge stability, brush behavior, and trend.