How to Adjust Brush Timing for Minimal Sparking
Brush timing is one of the first things people want to move when a commutator starts sparking. Often too early.
In our factory work, timing is not the first suspect. It is one suspect. A useful one. But only after the brush gear, spring pressure, commutator condition, and running accuracy have been checked.
If those basics are off, timing correction may reduce the spark for a short time. It will not solve the real problem.
Brush timing adjustment works best when the machine is mechanically sound, the brushes are stable in the holders, and the final correction is judged under the actual operating load.
Table of Contents
Safety Warning Before Any Brush Timing Adjustment
WARNING: Brush timing inspection and live correction must only be performed by qualified electrical maintenance personnel. Rotating commutators, exposed voltage, arc risk, and conductive dust create serious hazards. Follow plant isolation rules, PPE requirements, guarding procedures, and local electrical safety regulations before any inspection or adjustment.
We keep this simple.
No spark diagnosis is worth an injury.
What Brush Timing Actually Controls
Brush timing sets the brush position relative to the neutral zone where current reversal should happen with the least damage.
When timing is off, commutation shifts away from that neutral point. Then the brush breaks contact while current reversal is still incomplete, or already forced too far. That is when bar-edge burning starts, brush temperature rises, and carbon brush wear becomes uneven.
In day-to-day service, the visible result is usually one of these:
- fine but persistent sparking that grows with load
- hot brushes on one polarity group
- repeated darkening or roughening at bar edges
- unstable film on the commutator
- reduced brush life without an obvious mechanical cause
This is not only a brush timing issue. It also touches armature reaction, contact stability, and the condition of the whole brush rig.
Pre-Checks Before Adjusting Commutator Brush Timing
Before we touch the rocker ring or brush holder setting, we verify the machine deserves a timing correction.
Check these items first
- brushes are fully free in the holders
- brush spring pressure is even across the set
- holder spacing and holder angle are consistent
- brush seating is complete, not partial
- the commutator is round and clean
- mica is not high
- there are no copper burrs or raised bar edges
- vibration is under control
- the commutator film is stable enough to read
If any of those are wrong, spark observation becomes unreliable.
A machine with weak spring force, sticking brushes, poor seating, or runout can look like a timing problem. It is not. Or not mainly.
That matters because many failed timing adjustments are not wrong adjustments. They are correct adjustments applied to the wrong fault.
Signs of Incorrect Brush Timing
In our workshop, wrong timing usually shows up as a pattern, not a single symptom.
Common timing-related signs
- sparking increases as load rises
- all brushes of the same polarity behave similarly
- bar-edge discoloration repeats in a regular pattern
- spark location is consistent at either brush entry edge or exit edge
- commutator film becomes unstable after load changes
Signs that point away from timing
- only one holder or one arm sparks heavily
- spark pattern is random and jumping
- sparking changes with vibration or shaft movement
- one brush sticks, chatters, or runs hotter than the others nearby
- the commutator surface shows local mechanical damage
That second group usually means the root cause is mechanical, not brush timing.
Brush Timing vs Mechanical Faults: Quick Diagnosis Table
| Observation on the Commutator | Most Likely Meaning | First Action |
|---|---|---|
| Similar sparking on one polarity group | Timing or commutating condition is off | Check neutral position under operating load |
| Spark concentrated at brush exit edge | Under-commutation | Shift timing in small correction steps after confirming mechanical condition |
| Spark concentrated at brush entry edge | Over-commutation | Recheck neutral position and apply small correction |
| One holder sparks more than the rest | Local holder, spring, brush fit, or surface fault | Correct the local mechanical issue first |
| Random, unstable, jumping spark | Contact loss or runout | Inspect vibration, brush freedom, commutator roundness |
| Repeated bar-edge burn after retiming | Timing is not the main fault | Inspect commutating field, current balance, and armature condition |
We use this kind of table because field diagnosis has to move fast.
Not rushed. Just direct.
How to Adjust Brush Timing for Minimal Sparking
1. Establish a clean baseline
Start from the known neutral setting if the machine has one.
If the machine history is unclear, do not guess from old paint marks alone. Check the actual brush rig position, the current condition of the commutator, and any service notes from previous shutdowns.
A marked ring helps. A measured ring is better.
2. Observe the machine near its real duty point
Final judgment should be made near the normal operating load, not only at no-load.
That is where armature reaction shows itself properly.
That is also where weak commutation starts to separate from cosmetic spark behavior.
A machine can look quiet at no-load and still burn the commutator under production load.
3. Read the spark location, not just the spark size
This is where many teams lose time.
Do not only ask, “Is the spark strong or weak?”
Ask, “Where is it happening?”
- Exit-edge sparking usually points to under-commutation
- Entry-edge sparking usually points to over-commutation
That distinction tells you which side of the correct setting the machine is sitting on.
4. Correct in very small steps
Move the brush setting in small increments.
Very small.
In our practice, half-bar level correction is a good discipline when the machine design allows that kind of reference. Large jumps hide the best point and make diagnosis worse.
After each correction:
- let the machine stabilize
- recheck spark pattern
- compare brush temperatures if possible
- inspect whether the film begins to settle or degrade
Do not chase instant visual perfection. Watch for stability.
5. Stop when the commutator becomes stable, not just quieter
The best setting is not always the one with the briefest visual improvement.
We stop when these conditions line up:
- sparking drops to black commutation or only very fine pinpoint activity
- brush wear remains even enough across the set
- bar-edge distress stops increasing
- film starts to look more uniform after running time
- no holder group is behaving differently from the rest
That is the real endpoint.
How Load Affects Brush Timing
Load changes the job.
As current rises, armature reaction shifts the neutral zone. So a brush setting that looks acceptable at idle may be wrong at rated duty.
This matters in both DC motor commutator maintenance and generator brush sparking diagnosis.
For motors, the problem usually appears when the machine pulls real torque.
For generators, it often appears when output current rises and the neutral position no longer matches the brush setting.
That is why we do not approve a timing adjustment from a casual no-load check alone.
Under-Commutation vs Over-Commutation
These two faults often get mixed together because both produce sparks. The cure is not the same.
Under-Commutation
Current reversal is too slow.
The brush leaves the segment before reversal is complete.
Typical signs:
- spark near brush exit edge
- rising spark under heavier load
- repeated bar-edge burning
- growing temperature on affected brush groups
Over-Commutation
Current reversal is pushed too hard or too early.
The reversal overshoots the calm zone.
Typical signs:
- spark near brush entry edge
- aggressive surface marking even when contact looks stable
- uneven film formation across the track
If the machine keeps moving between these two states after correction, timing may not be the main issue. Check commutating field strength, armature condition, and current distribution.
Common Mistakes During Brush Timing Adjustment
We see the same errors again and again.
Adjusting timing before checking spring pressure
Uneven pressure changes current sharing. Then the spark pattern lies to you.
Correcting timing on a rough or out-of-round commutator
This does not fix timing. It hides contact loss for a while.
Judging too quickly after each movement
The machine needs time to settle. So does the film.
Chasing zero visible spark at any cost
Absolute zero spark is not the target in every machine. Stable low-damage commutation is the target.
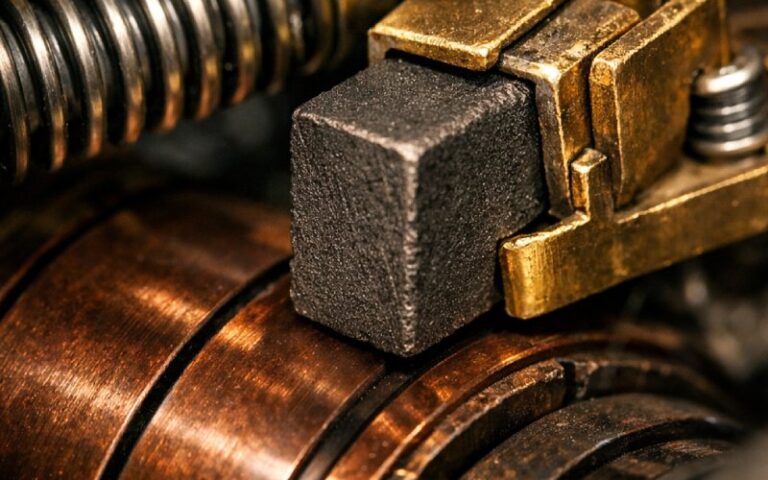
Ignoring carbon brush wear pattern
Brush wear is evidence. If one group keeps wearing faster, something is still wrong.
Treating one hot holder as a full-machine timing fault
Local faults need local correction first.
A Practical Inspection Sequence We Use in the Factory
When a customer reports commutator sparking, our internal sequence is usually this:
- inspect commutator surface condition
- check brush freedom and spring consistency
- review wear pattern across all holders
- separate local faults from group faults
- observe spark pattern at operating load
- identify entry-edge or exit-edge behavior
- apply small timing correction only if the mechanical base is sound
- verify stability after running time, not only immediately after adjustment
That order saves time. More importantly, it prevents false fixes.
When Brush Timing Is Not the Main Problem
Timing is often blamed because it is adjustable.
That does not make it guilty.
If the machine still shows repeated commutator distress after careful retiming, the real cause may be one of these:
- poor commutator roundness
- weak or uneven spring force
- incorrect brush grade selection
- armature winding issues
- commutating pole mismatch
- overloaded duty cycle
- contamination on the commutator track
- unstable supply or current imbalance
At that point, further timing movement usually does more harm than good.
FAQ
Should brush timing be adjusted at no-load or under load?
No-load is useful as a starting reference. Final evaluation should be made near the actual operating load. That is when armature reaction and real commutation behavior can be judged correctly.
What is the main sign of incorrect brush timing on a commutator?
The most useful sign is a repeatable spark pattern that increases with load and appears consistently at either the entry edge or exit edge of the brush.
Can wrong brush timing cause fast carbon brush wear?
Yes. Incorrect timing increases commutation stress, which can raise brush temperature, damage the film, and accelerate carbon brush wear.
How do I tell brush timing problems from mechanical problems?
If the fault appears across a full polarity group, timing is more likely. If it appears on one holder, one arm, or changes randomly with vibration, check mechanical causes first.
What is the difference between under-commutation and over-commutation?
Under-commutation means current reversal is too slow. Over-commutation means reversal is pushed too far or too early. The spark location at the brush edge usually helps separate the two.
Can I fix heavy generator brush sparking by changing timing alone?
Not always. Timing can reduce sparking, but it cannot compensate for weak brush pressure, poor commutator condition, current imbalance, or internal electrical faults.
What is the best result after timing adjustment?
A stable commutator, low-damage commutation, even wear pattern, and no continued bar-edge distress. That is better than chasing a brief visual zero-spark result.
Final Working Rule
Adjust brush timing only after the machine has earned that adjustment.
If the mechanical base is wrong, timing will not save it.
If the load condition is ignored, timing will not hold.
If the spark edge is misread, timing will move the fault, not remove it.
Minimal sparking comes from the whole system being in balance.
Brush position is part of that system. Not the whole of it.
Need Support on a Repeating Sparking Problem?
If your team is dealing with repeat commutator burning, unstable brush wear, or hard-to-read spark patterns, send us the machine type, operating current, commutator diameter, brush quantity, rotation direction, and photos of the track condition. Our engineering team can review the failure pattern and advise on the next inspection step.