Commutator Surface Conditions: Causes, Troubleshooting, and When to Replace
A commutator does not fail all at once. It starts by losing stability. Film turns selective. One path runs hotter. Slot edges begin to collect metal. A few bars polish differently from the rest. Then the surface stops being a surface problem and starts becoming a current distribution problem, a geometry problem, or both. That is usually where replacement decisions get delayed too long.
In our factory work, we do not read commutator surface conditions as cosmetic defects. We read them as operating evidence. Some marks still belong to routine service. Some already mean the contact system is unstable. Some mean the machine has crossed the point where resurfacing is no longer the economical option.
Table of Contents
What Is a Normal Commutator Surface Condition?
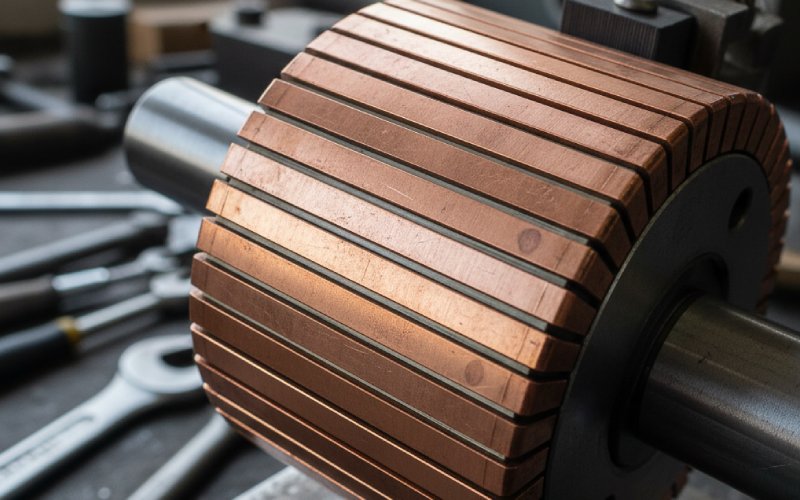
A normal commutator surface is not defined by one exact color. In stable operation, the film may range from light brown to dark brown or even darker. The key is uniformity. Even film, smooth current transfer, no destructive sparking, no selective wear. That is what matters. Not whether the surface looks lighter or darker than the last machine in the shop.
We usually become cautious when the film stops being even. Patchy brightness, isolated dark zones, raw copper, streaks that do not clean up, or one brush track aging faster than the others. Those signs rarely stay isolated. They tend to point to unstable brush contact, low current density, contamination, out-of-round geometry, or poor slot condition.
Quick Diagnosis Table for Commutator Surface Conditions
| Surface condition | What it usually means | Can it usually be repaired? | What we check next |
|---|---|---|---|
| Even light or dark film | Stable contact and acceptable film formation | Yes | Record baseline only |
| Streaking | Film instability, often linked to contamination, low load, or low pressure | Usually | Load profile, atmosphere, spring pressure, brush seating |
| Threading | Metal transfer has embedded in the brush face and is cutting the surface | Sometimes | Brush face condition, current density, contamination, pressure |
| Bright spots | Local contact loss or overload under the brush path | Sometimes | Brush freedom, pressure balance, commutation stability |
| Bar edge burning | Poor commutation, electrical imbalance, or overload | Sometimes | Neutral setting, current sharing, winding condition |
| Slot pattern burning | Repeating electrical or winding-related stress | Limited | Armature symmetry, duty cycle, transient load |
| Copper drag | Overheated copper transfer at slot edges, often with vibration or sparking | Limited | Slot cleanliness, vibration, surface temperature, brush action |
| High mica / burrs | Mechanical interruption of brush contact | Yes, if early | Undercut quality, bevel, burr removal |
| Out-of-round / high bars / flat spots | The brush cannot maintain stable contact | Sometimes | Runout, bar tightness, bearings, finishing quality |
| Loose bars / recurring distortion | Structural instability, not just surface wear | Usually no | Replacement evaluation |
The reason this table matters is simple: not every damaged-looking surface needs a new commutator, and not every resurfaced commutator deserves to stay in service. The cost question is not “can it be cut again?” The real question is “will the root cause still be there after cutting?”
Commutator Streaking: Causes, Risks, and Corrective Actions
Streaking is often the first visible warning that film formation is losing balance. At this stage, the copper may still be serviceable. The problem is that streaking often sits upstream of more destructive conditions. If metal starts collecting in the brush face, streaking can move into threading, accelerated brush wear, and rising commutator temperature.
In practice, we trace streaking back to a short list first: low current load, low or uneven spring pressure, contamination in the air path, poor seating, or a brush path that is carrying less work than it should. Operators often want to polish it away. That helps the appearance, not the cause. If the machine returns to the same load profile and the same contact conditions, the pattern comes back. Usually faster.
For OEM buyers, streaking also matters before the machine is even assembled. If the commutator geometry, slot finish, runout, or segment consistency is weak, the brush system has less margin. The surface shows that later, but the weakness started much earlier.
Commutator Threading: Why Metal Transfer Damages the Surface
Threading means the surface is being machined in service. Fine screw-like lines do not appear by accident. They usually form after transferred metal lodges in the brush face, hardens, and starts acting like a cutting tool against the copper bars. Once that happens, the problem is already beyond simple discoloration.
We see threading most often on machines that spend too much time under light load, on systems with low current density across too many brushes, or where pressure and atmosphere are not supporting stable film formation. It can also follow long-term streaking that was left in service too long.
When threading is confirmed, our rule is straightforward. Do not treat it as a finishing defect only. Remove the contaminated brushes from service, correct the contact conditions, and then judge whether the commutator can still be restored economically. If the cut required to clean the surface is too deep, or if threading returns after correction, replacement becomes the better option.
Bar Edge Burning, Bright Spots, and Repeating Burn Patterns
Bright spots usually point to localized loss of film or unstable contact. Bar edge burning is more serious. That tends to indicate poor commutation, overload, weak current sharing, or a machine-side electrical fault rather than a surface finish issue alone.
The repeating patterns matter. Every second, third, or fourth bar showing similar distress is not random wear. That kind of spacing usually points to armature or commutation geometry, not just brush condition. This is where many maintenance teams waste time changing brushes when the actual problem is symmetry, duty cycle, or winding-related stress.
For a replacement supplier, this section is important for one reason: once bar damage becomes periodic and recurring, buyers should stop asking only how to clean the surface. They should ask whether the existing commutator still has a sound base for continued machining. If not, an OEM-spec or custom replacement is the lower-risk move.
Copper Drag on Commutators: Warning Signs and Risks
Copper drag is one of the conditions we treat with urgency. It usually develops when the commutator surface becomes overheated and softened, then copper is pulled across the slots rather than forming a stable film. Vibration, poor contact, contamination, and abrasive interaction can all push the surface in that direction.
The danger is not only wear. Copper accumulates at the bar edge and can move toward the mica insulation. Once that buildup starts bridging the slot region, the risk is no longer just a rough surface. Now you are close to electrical trouble between bars.
If a machine has recurrent copper drag after cleaning and correction, we usually advise buyers to compare total repair cost against replacement cost immediately. Recutting slots and polishing the surface is not a durable answer when the copper keeps moving. In those cases, a new commutator with controlled segment fit, slot machining, and runout is often cheaper than another cycle of downtime.
High Mica, Burrs, and Slot Problems
High mica, mica fins, copper burrs, and slots filled with debris create a simple problem with expensive consequences: the brush cannot cross the surface cleanly. The result is unstable contact, edge chipping, vibration, and sparking that gets blamed on the wrong component.
After resurfacing, the slot condition still has to be right. The mica must sit below the copper where undercutting is required, the slot must be clean, and the bar edges must transition smoothly enough that the brush does not get hit at every crossing. Poor undercutting work can damage a fresh rebuild almost immediately.
This is also where manufacturing discipline shows up clearly. In our own production control, slot geometry is not a side detail. It directly affects contact stability, brush life, and the margin before sparking begins. Buyers who only compare diameter and bar count tend to miss that.
Out-of-Round Commutators, High Bars, and Flat Spots
Out-of-round commutators, high bars, and flat spots create brush bounce. Once the brush loses contact rhythmically, the following bars take the punishment. A high bar is often polished first. The bars behind it then appear rough, pitted, or burned because the brush is no longer landing on a stable surface.
This is why we do not like “brush-only” solutions for machines showing repeating surface marks in one circumferential sequence. The first job is measurement. Check runout. Check bar stability. Check whether the condition only appears hot. Some commutators measure round when cold and still develop trouble under operating temperature and load.
When runout or bar instability is persistent, resurfacing is only a temporary reset. If the condition returns after proper machining, buyers should move quickly to a replacement evaluation instead of funding repeated downtime.
When to Repair a Commutator and When to Replace It
Repair still makes sense when the commutator is mechanically sound, the bars are tight, the required cut is moderate, and the root cause has already been corrected. Streaking, early grooving, minor film instability, and correctable slot defects often belong in that category.
Replacement moves to the front when one or more of these conditions show up together:
- recurring copper drag
- repeated threading after correction
- loose bars
- severe bar edge burning
- thermal distortion under duty
- out-of-round returning after machining
- slot damage that keeps destabilizing brush contact
- repeated sparking after pressure, seating, and alignment have already been corrected
This is the practical dividing line we use with buyers: if repair cost keeps restoring appearance but not operating stability, replacement is already overdue. That is usually the point where a properly manufactured OEM-spec or custom commutator reduces total maintenance cost more effectively than one more shop repair.
How We Reduce Surface Condition Failures in Commutator Manufacturing
Surface problems are not created by surface appearance alone. They are shaped by manufacturing quality long before the machine runs. That is why we focus on the basics that stay visible later in service: segment consistency, controlled runout, stable assembly, correct slot geometry, clean undercutting, burr control, and surface finish that supports brush seating instead of fighting it.
For replacement and custom projects, we also review the application itself. Speed, load profile, duty cycle, reversal, environment, and service history all matter. A commutator that looks dimensionally interchangeable on paper may still fail early if its build quality or application fit is weak. Buyers usually notice that only after the surface starts telling the story.
This is why we do not treat commutator supply as a catalog-only decision. For many OEM and repair customers, the real value is not just making a new part. It is building a replacement that does not return with the same surface condition six months later.
FAQ
What is a normal commutator surface condition?
A normal surface has an even, stable film and no destructive sparking or abnormal selective wear. The color may vary from light brown to dark brown or darker depending on operating conditions. Uniformity matters more than shade.
Is commutator streaking normal?
It can appear in service without immediate failure, but it should not be ignored. Persistent streaking usually means film instability, and it can develop into threading or accelerated wear if the cause is left in place.
What causes commutator threading?
Threading usually starts with metal transfer from the commutator into the brush face. That embedded metal hardens and begins cutting fine screw-like lines into the copper surface. Low load, low current density, low spring pressure, and contamination are common contributors.
What causes copper drag on a commutator?
Copper drag is typically linked to overheating, softened copper at the interface, vibration, unstable contact, or contamination that prevents normal film behavior. Once copper begins collecting at slot edges, the risk level rises quickly.
Can high mica cause sparking and brush chipping?
Yes. High mica, mica fins, copper burrs, or debris-filled slots interrupt smooth brush travel and can trigger vibration, edge damage, and sparking even after resurfacing.
When should a commutator be replaced instead of resurfaced?
Replacement is usually the better option when the commutator has loose bars, recurring out-of-round behavior, repeated copper drag, severe bar burning, thermal distortion, or repeated return of the same defect after proper repair.
How does manufacturing quality affect commutator surface stability?
Runout, slot geometry, undercut quality, burr control, segment consistency, and surface finish all affect how stable the brush contact will be in service. Weak manufacturing control reduces the operating margin and makes destructive surface conditions appear earlier.
Need Help Evaluating a Damaged Commutator?
If your motor is showing recurring streaking, copper drag, bar edge burning, slot damage, or unstable roundness after machining, it may be time to stop funding repeated repair cycles.
Send us your drawings, dimensions, photos, or worn sample. Our engineering team can review whether repair is still economical or whether a new OEM-spec or custom commutator is the better long-term choice.
Contact XDC today for a technical review and quotation.